
In the fast-paced world of software development, ensuring your code works as expected is paramount.
That’s where testing comes in, and to make the process more efficient, we’ve developed TestPulse—a powerful tool that transforms raw test data into a visually appealing and informative website.
In this blog post, we’ll walk you through setting up a Java project using Gradle, writing simple tests, running JUnit, integrating Jacoco, and finally, preparing your test results for TestPulse. Let’s dive in!
1. Setting Up a New Java Project with Gradle
To get started, you’ll need to create a new Java project. In this tutorial we will use Gradle. For convenience, we created an example repository that you can just clone: TODO. Otherwise, follow along.
Let’s create some simple Java classes and corresponding unit tests. First, create three new Java files: Addition.java, Subtraction.java and Multiplication.java.
Addition.java:
1
2
3
4
5
6
7
package io.testpulse.example;

public class Addition {
    public int add(int a, int b) {
        return a + b;
    }
}
Subtraction.java:
1
2
3
4
5
6
7
package io.testpulse.example;

public class Subtraction {
    public int subtract(int a, int b) {
        return a - b;
    }
}
Multiplication.java:
1
2
3
4
5
6
7
package io.testpulse.example;

public class Multiplication {
    public int multiply(int a, int b) {
        return a * b;
    }
}
These classes provide basic functionality for some math operations. Now, let’s write tests to verify they work correctly.
2. Write Unit Tests Using JUnit
Navigate to the src/test/java directory and create two test files: AdditionTest.java and SubtractionTest.java.
NOTE: we are not creating a test for Multiplication.java on purpose!
AdditionTest.java:
1
2
3
4
5
6
7
8
9
10
11
12
13
14
15
package io.testpulse.example;

import org.junit.jupiter.api.Test;
import static org.junit.jupiter.api.Assertions.assertEquals;


public class AdditionTest {
    @Test
    void testAdd() {
        Addition addition = new Addition();
        assertEquals(5, addition.add(2, 3));
        assertEquals(-1, addition.add(2, -3));
        assertEquals(0, addition.add(0, 0));
    }
}
SubtractionTest.java:
1
2
3
4
5
6
7
8
9
10
11
12
13
14
15
package io.testpulse.example;

import org.junit.jupiter.api.Test;
import static org.junit.jupiter.api.Assertions.assertEquals;


public class SubtractionTest {
    @Test
    void testSubtract() {
        Subtraction subtraction = new Subtraction();
        assertEquals(1, subtraction.subtract(3, 2));
        assertEquals(5, subtraction.subtract(2, -3));
        assertEquals(0, subtraction.subtract(0, 0));
    }
}
These test classes use JUnit 5 to verify that the add and subtract methods return the expected results.
3. Running JUnit Tests and Locating the Results
With your tests written, it’s time to run them and inspect the results. To execute the tests, simply run the following command in your project’s root directory:
1
> ./gradlew test
Gradle will compile the classes and run the tests. You’ll see the output in your terminal, indicating whether the tests passed or failed.
JUnit results are saved in a standardized format in the build directory. The files we are interested in (we will upload them to TestPulse in the next step) are located in build/test-results/tests/ Go to this directory and you will see 2 XML files, one for each test.
4. Integrating Jacoco for Code Coverage
Unit tests are great, but knowing how much of your code is covered by these tests is even better. And with TestPulse, it’s gonna look even better!
To integrate Jacoco, modify your build.gradle file and add the Jacoco dependency:
1
2
3
4
5
6
7
8
9
10
11
12
13
14
15
16
plugins {
    id 'java'
    id 'jacoco'                  // --------- ADD this line here
}

test {
    useJUnitPlatform()
    finalizedBy jacocoTestReport // --------- ADD this line here
}

jacocoTestReport {               // --------- ADD this block here
    reports {
        xml.required = true
        html.enabled = true
    }
}
This configuration tells Gradle to use Jacoco and to generate both XML and HTML reports after running the tests.
4.1 Run the tests in coverage mode
Run the tests again using the same command of before:
1
> ./gradlew test
Gradle will execute the tests and then generate the code coverage reports. You can find the reports in:
1
2
build/reports/jacoco/test/html/index.html
build/reports/jacoco/test/jacocoTestReport.xml
The HTML report provides a visual overview of code coverage, while the XML report is what we’ll need to integrate with TestPulse. This file is essential for feeding TestPulse with the necessary data to create your comprehensive test reports.
5. Preparing for TestPulse
Now that you’ve got your test results and code coverage report ready, you’re all set to integrate with TestPulse.
5.3 Save the token as an environment variable in Jenkins
If you already setup the token for this organization, feel free to skip this step! Otherwise, follow along.
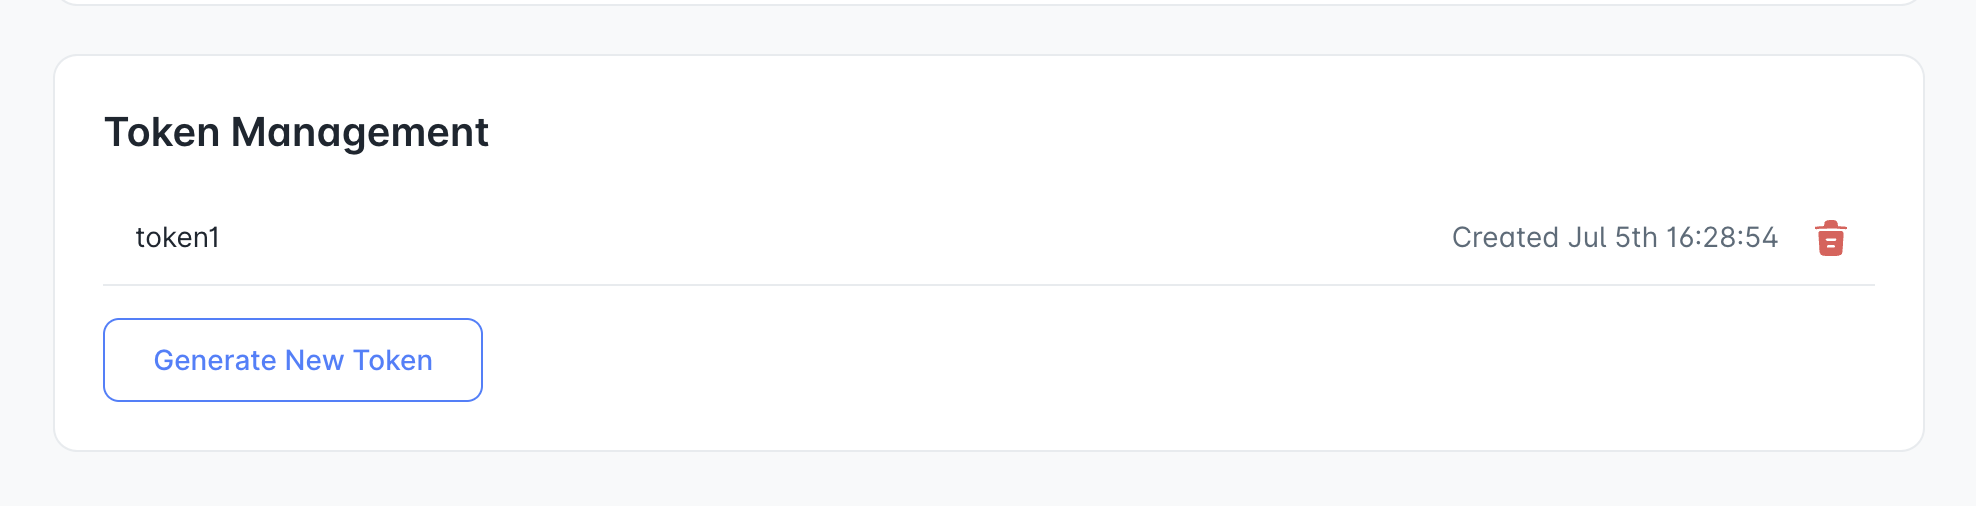
After installing the app and landing on TestPulse homepage you will see a banner saying you have not set up a token. This token is used for authenticating your user when uploading test results to us.
From the TestPulse website, go to Settings and create a new token under the Token Management section.
NOTE: the token will be only shown ONCE, so make sure to save it!
Once you copied the token, we can save add it as environment variable in Jenkins.
From Jenkins: Manage Jenkins –> Nodes –> Configure Node, under Node Properties, you can configure “Environment Variables” for the Node.
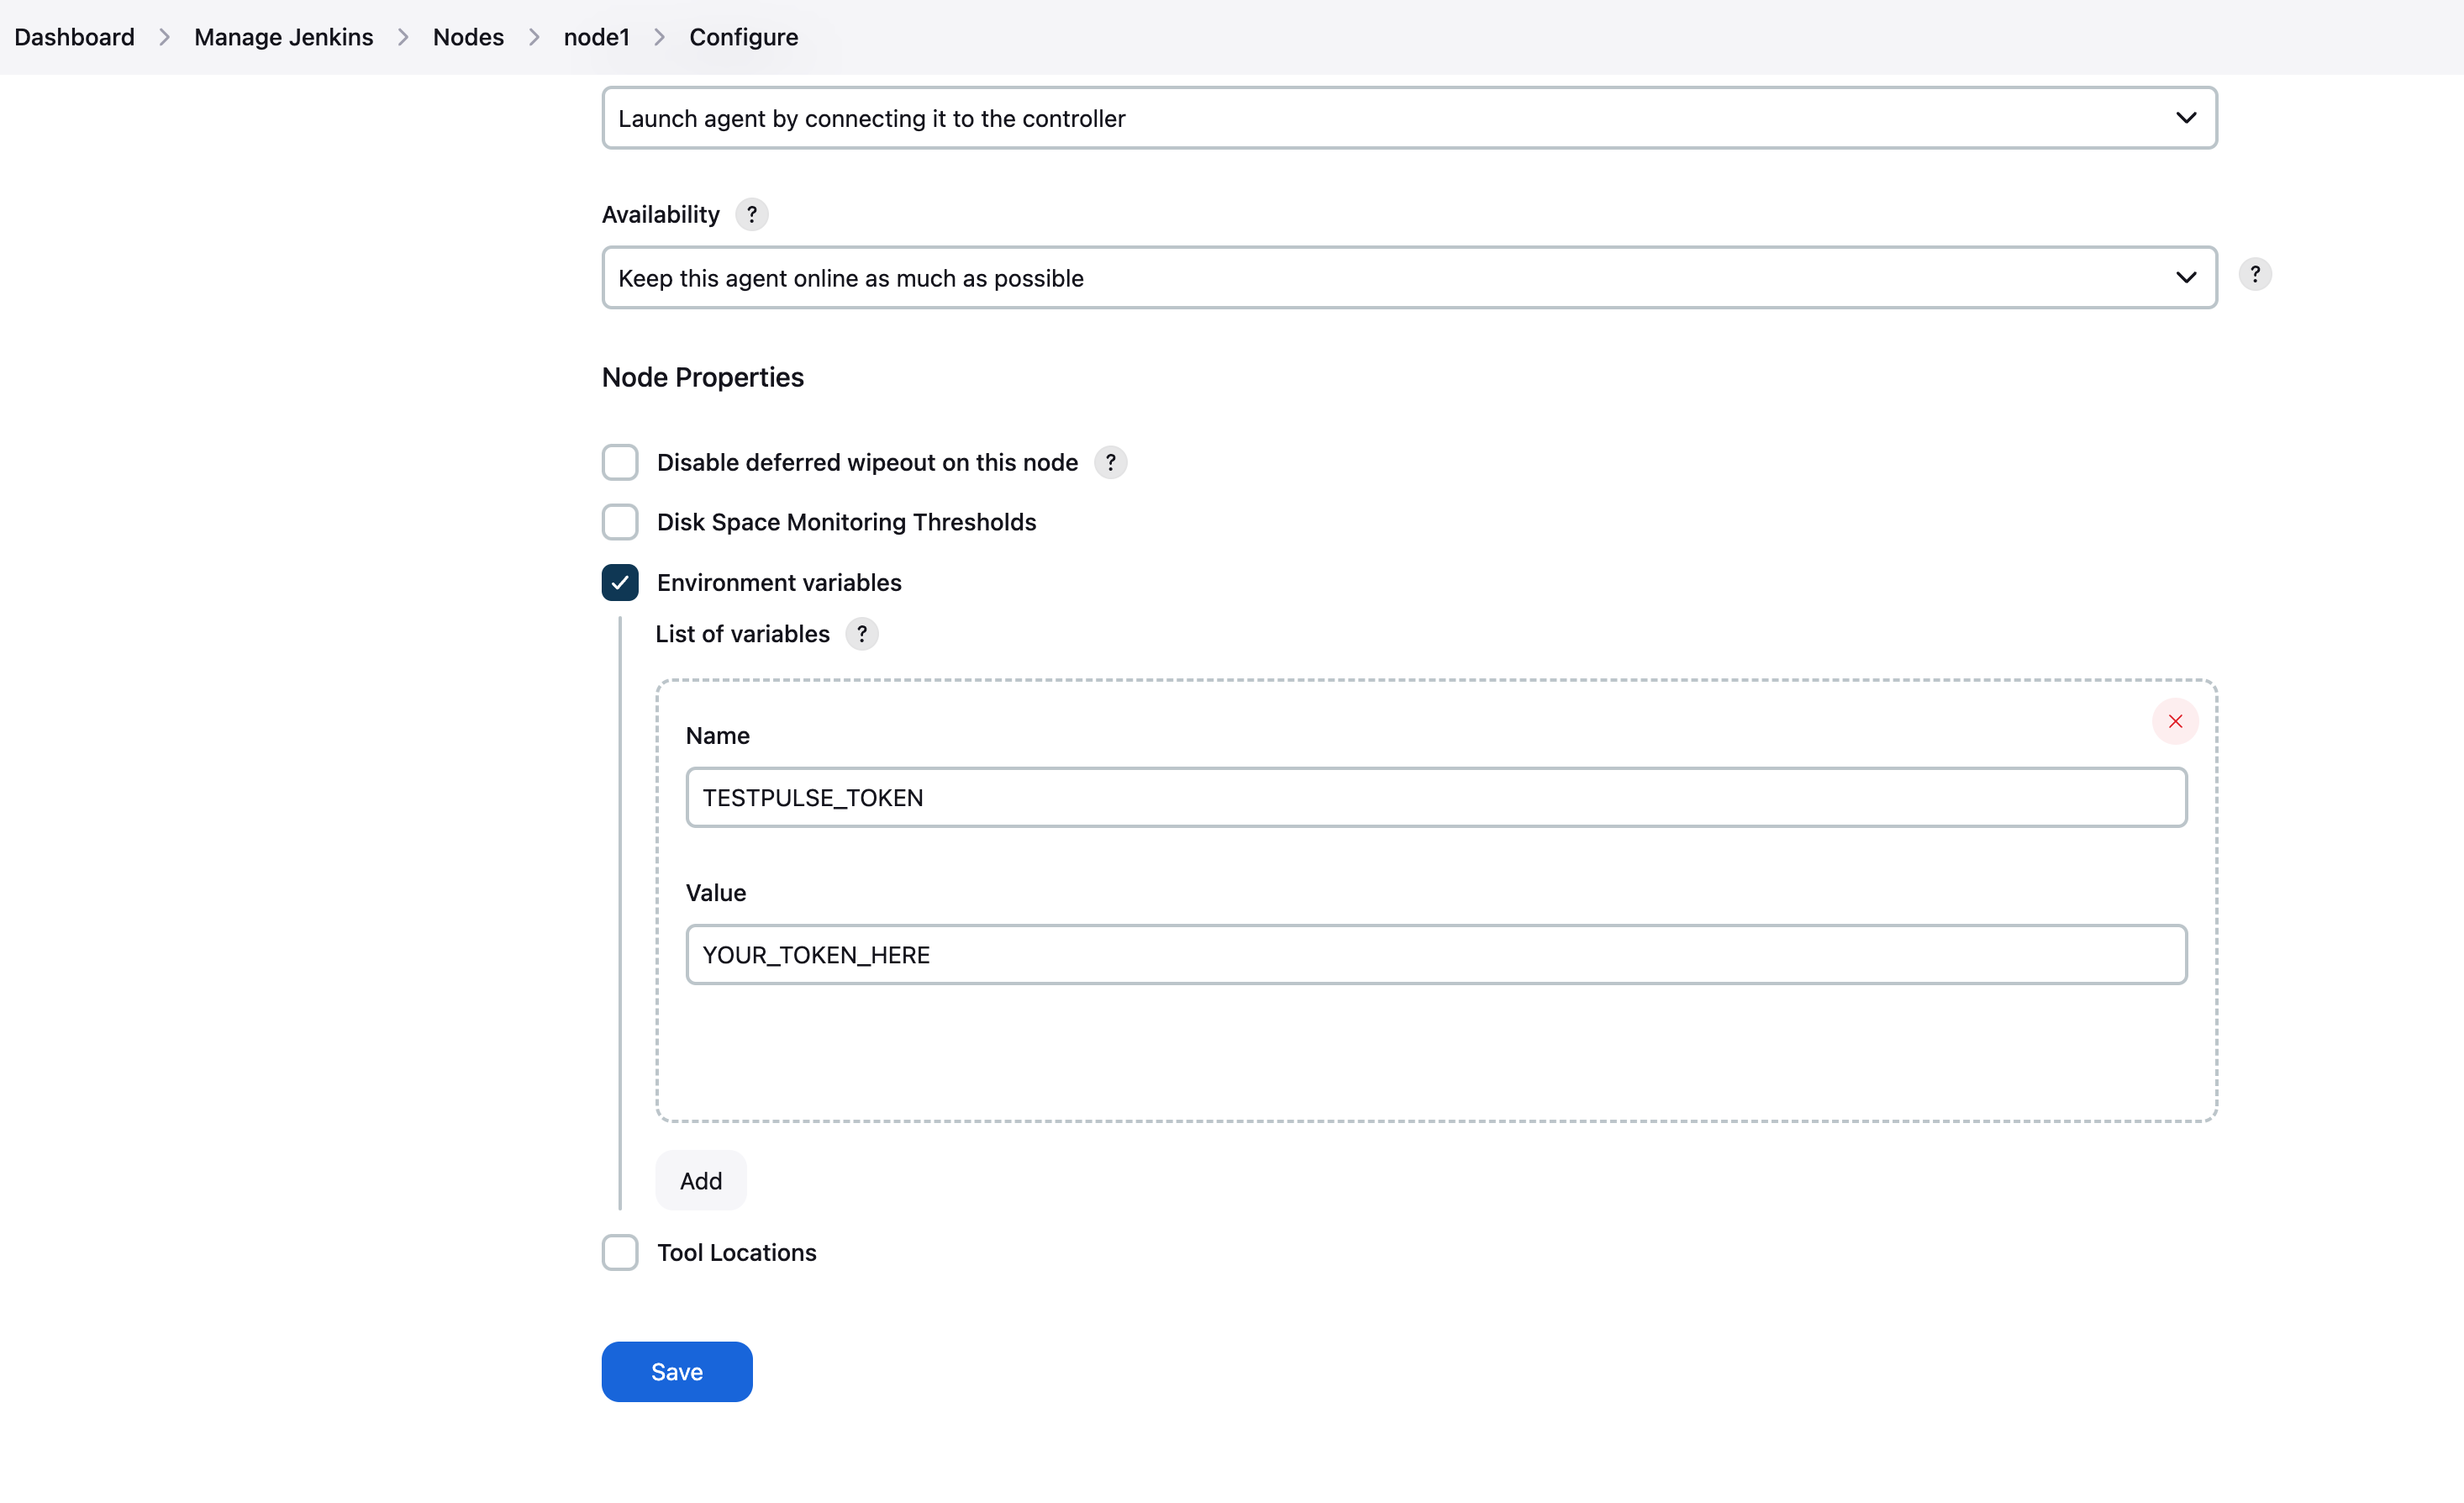
Create a new env variable named TESTPULSE_TOKEN, and add the token you copied from TestPulse in the previous step.
5.2 Jenkins Pipeline
Once TestPulse is installed, we need to integrate it with our CI pipeline. In this tutorial we will show you how to integrate it with Jenkins.
First, let’s start with a basic pipeline (for more information on how to write Jenkins pipelines, check out their documentation).
Our basic Jenkinsfile:
1
2
3
4
5
6
7
8
9
10
11
12
13
14
pipeline {
    agent any

    stages {

        stage('Build and Test') {
            steps {
                script {
                    sh './gradlew clean test'
                }
            }
        }
    }
}
As you can see, we only have 1 step that runs ./gradlew clean test.
When Gradle runs, it will create test reports. We now need to upload these reports to TestPulse to analyze.
5.4 Add TestPulse upload step
Now that we set the env variable, we can authenticate and upload the test results.
Since our utility is written in python, you first need to setup a python environment (if not already setup!). Then, install our python utility called testpulse-uploader using pip install.
Finally, call testpulse-upload and pass all the necessary parameters. The full list of parameters is explained in its documentation.
Since we want to always upload test results to TestPulse (even if there are failures!), you should put this step in the post of the test step, otherwise it will not run.
For example:
1
2
3
4
5
6
7
8
9
10
11
12
13
14
15
16
17
18
19
20
21
22
23
24
25
26
27
28
29
30
31
32
pipeline {
    agent any

    stages {
        stage('Build and Test') {
            steps {
                script {
                    sh './gradlew clean test'
                }
            }

            post {
              always {
                    sh """
                        # Setup python environment
                        apt install -y python3.12-venv

                        # Create a virtualenv
                        python3.12 -m venv venv
                        . venv/bin/activate

                        # Install testpulse-uploader
                        pip install testpulse-uploader

                        # Upload the results
                        testpulse-upload -tr "build/test-results/test/.*\\.xml" -cr "build/reports/jacoco/test/.*\\.xml" --config-file .testpulse.yaml
                    """
                }
            }
        }
    }
}
The uploader has many options. We suggest you to read its its documentation.
6. Push some code and check the results
Configuration-wise, you are done! With our new Jenkins pipeline, let’s make a commit so that we trigger the CI.
If you open the logs of the node you should see that the upload to TestPulse is completed correctly:
1
2
3
4
5
6
7
8
9
10
GitHub detected...
Authenticating...
Authenticated successfully.
Finding files and zipping...
We found a total of 3 test results.
Config file did not exist, or the provided path was not correct.
Saved zip file in /tmp/tmpukdht106.zip
Uploading to our backend server...
Upload was successful!
TestPulse URL: https://app.testpulse.io/testpulse-io/java-gh-actions/builds/URL
Now we can navigate back to TestPulse and check the results!
Right from the homepage, we can see that there are 0 broken tests, 1 build, and 0 flaky tests:
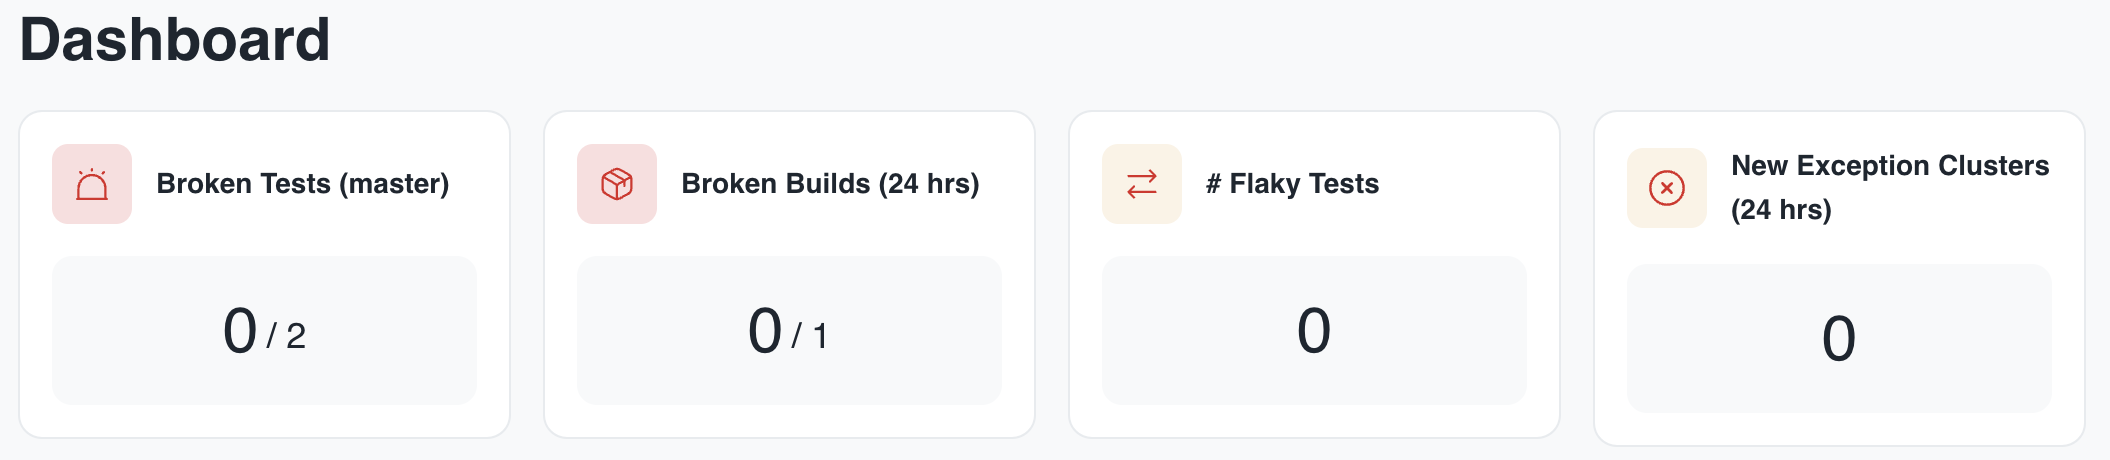
The graphs in the Homepage are empty, since they are refreshed every day we will need to wait 1 day.
Let’s checkout the coverage! Navigate to Coverage Report on the left side, you should see your project packages. Now navigate to the files, and check out the coverage:
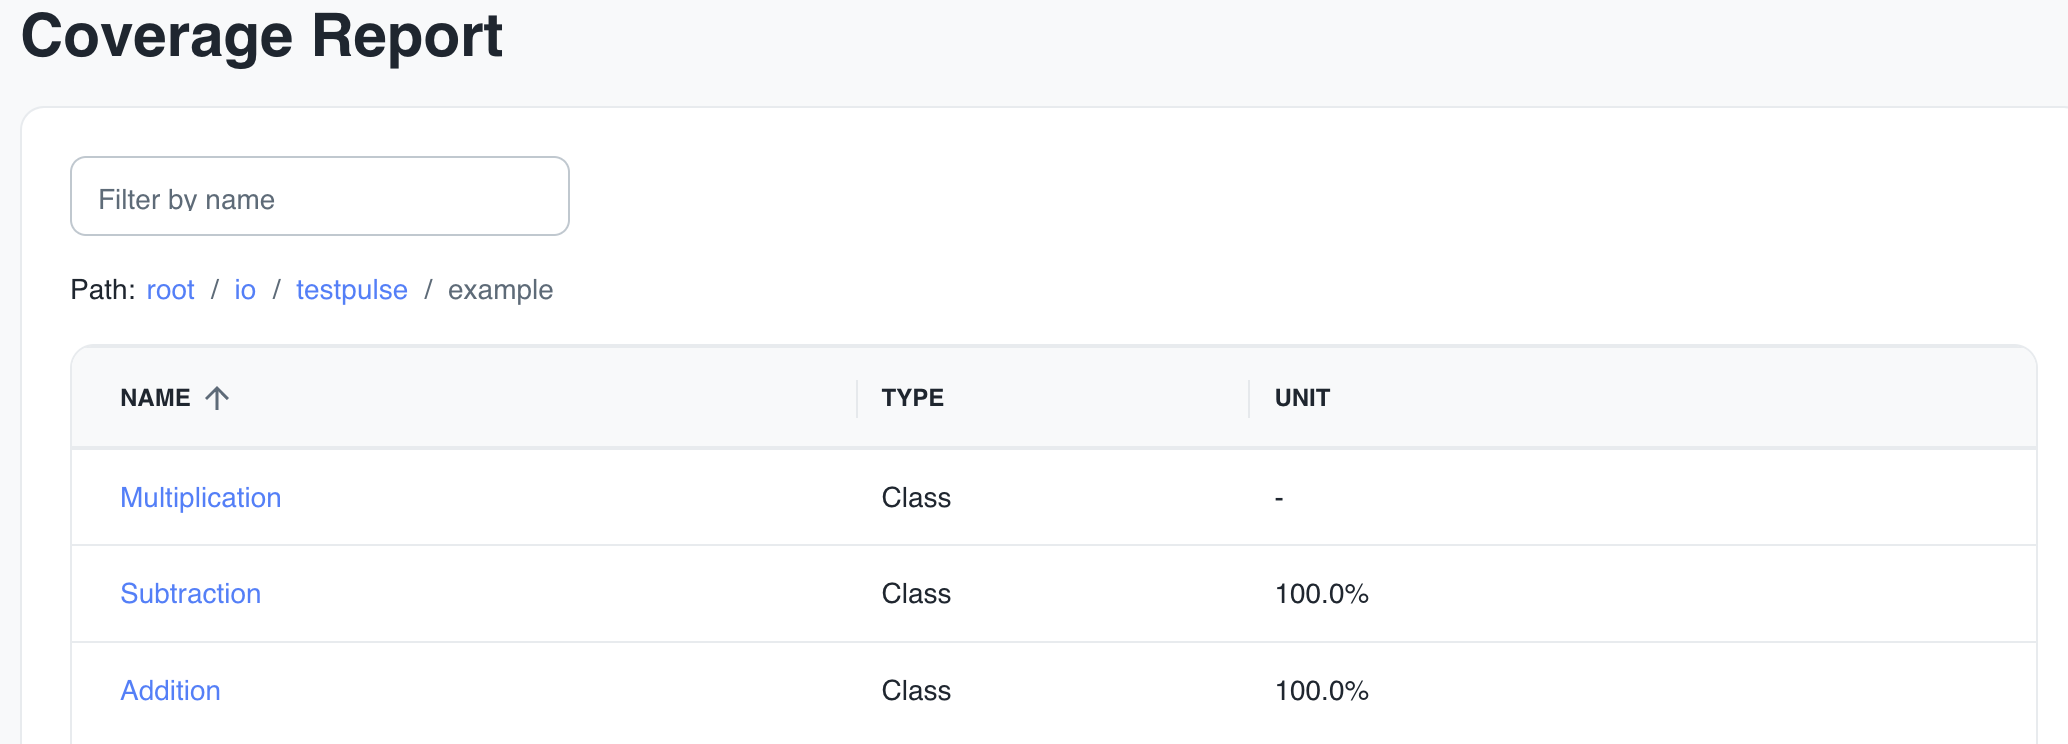
Subtraction and Addition are 100% covered, but not Multiplication :pensive:
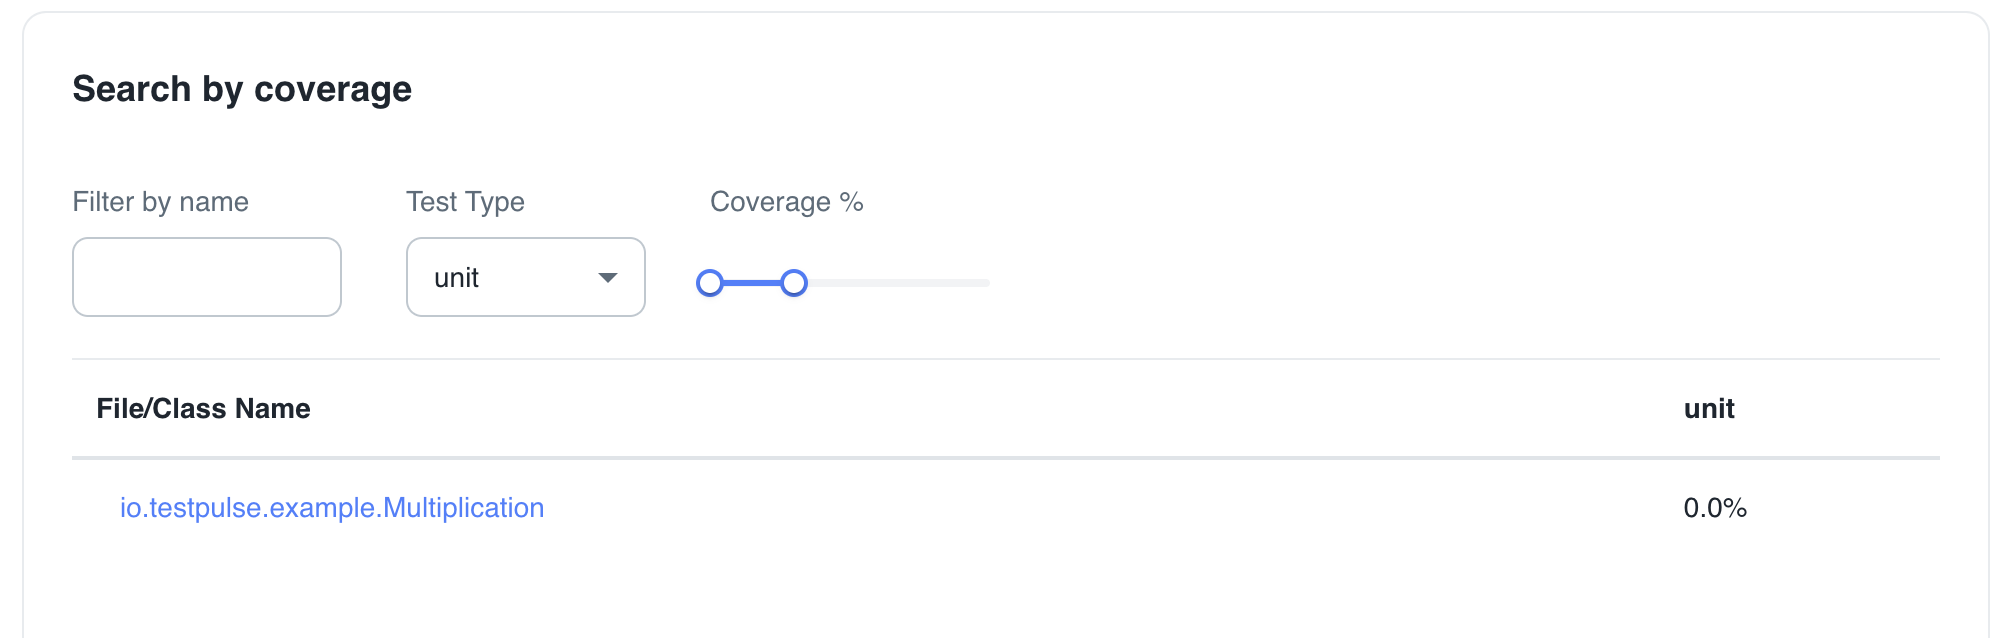
We can further check coverage by navigating to Coverage Stats on the left side, scroll down to Search by coverage, and you will see all the files that have 0% coverage:
Conclusion
In this guide, we’ve walked through setting up a new Java project with Gradle, writing and testing simple classes, integrating Jacoco for code coverage, and preparing your results for use with TestPulse. By following these steps, you’re laying the groundwork for a robust testing strategy that will keep your codebase healthy and maintainable.
TestPulse is here to make test reporting effortless and insightful. Start using it today to take your testing game to the next level!
Let us know in the comments how TestPulse is helping your development process and what features you’d like to see next. Happy coding!